|
|
|
|
|
|
Setting up direct communication between Polar Atlas and the Tektronix DSA8300
Application Note AP612
|
|
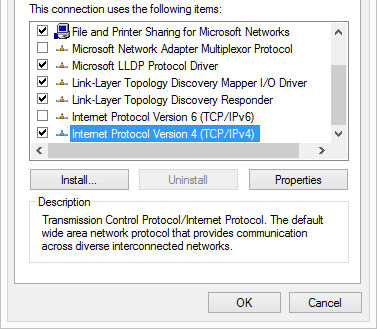
Polar's Atlas GHz Test System Polar's Atlas GHz Test System is designed to acquire data from the Tektronix DSA8300 with 80E04 plug-in using the TekVISA connectivity software – TekVISA is the Tektronix implementation of VISA, an industry-standard communication protocol. TekVISA must be installed and running on the DSA8300 and the host PC in order to communicate data and applications between the instrument and the PC. TekVISA provides network access to the DSA8300 by including VXI-11 client and server software components. The VXI-11 LAN Server is installed on the DSA8300 as part of the TekVISA software installation. The VXI-11 LAN Client is included as a VISA instrument resource type on the client/host PC with TekVISA software installed. The VXI-11 Server on the DSA8300 must be enabled. Locate the blue and gray icon in Windows Desktop taskbar (lower right-hand corner). If the icon has a red circle with a slash through it, then right click on the Icon, and select Start VXI-11 Server. NOTE. To start VXI-11 Server automatically next time the scope is powered on then select Server Properties, and Check Start server automatically at system power up. The Atlas – TekVISA – DSA8300 system communicates via Windows networking using TCP/IP over Ethernet and can be set up using the standard Windows networking dialogs. In this note we describe how to connect the Tek DSA8300 to a PC running Atlas and TekVISA when both instrument are not part of an existing network. The note assumes the network hardware and the TekVISA connectivity software is correctly installed on both the PC and the DSA8300. Connecting Atlas and the TDR directly When the TDR and controlling PC are not part of any network it will be necessary to connect them together directly via a crossover ethernet cable (crossover cables should be clearly marked as such) or two standard ethernet cables through a network switch or hub. Note: Most modern hubs and switches auto-detect the cable type and configure the connection appropriately. In addition, many recent network interface cards will auto detect normal/crossover cables and configure themselves accordingly. Plug the network cable into the RJ45 (network) sockets on the PC and Tek DSA8300. Configuring the DSA8300 In a directly connected closed network, the network settings of the DSA8300 must be set manually. The DSA8300 runs under the Windows 7 operating system; from its Control Panel choose Network and Sharing Center, click the Ethernet Connection, in the Ethernet Status window click Properties.
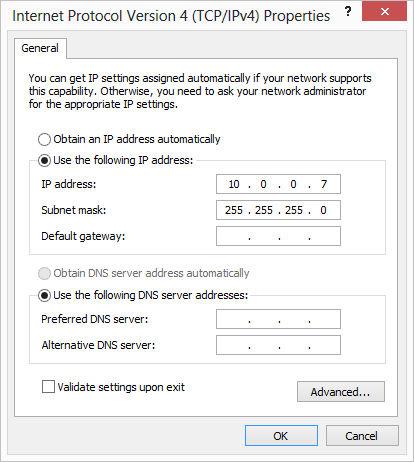
Choose Internet Protocol Version 4 (TCP/IPv4) and choose Properties – click the Use the following IP address option:
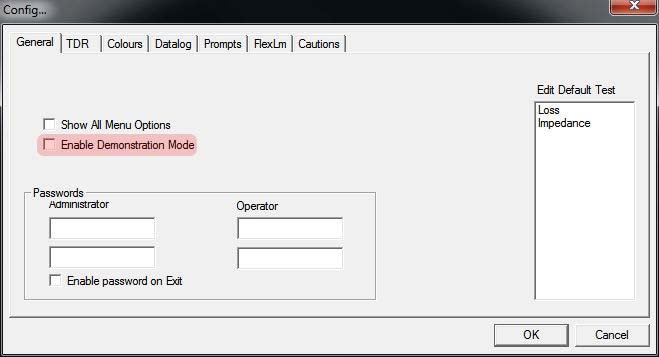
Specify the IP address and subnet mask (10.0.0.7 in the example above.) The first three octets of the IP address (containing 10.0.0) should match those of the host PC; note the fourth octet (the final 7) – you will need to set the host PC to an adjacent address (e.g. 10.0.0.15) and the subnet mask to 255.255.255.0 – leave the other settings blank. Close the dialogs. Setting up the workgroup From Control Panel choose System and select the Computer Name tab; click Change... and ensure the Workgroup option is selected; note the workgroup name – it will be necessary to ensure the DSA8300 and the host PC share the same workgroup name. Note: Changing the computer or workgroup name will require a system restart. This action must be performed on both the DSA8300 and the controlling PC. Configuring Atlas To apply the network settings, start Atlas and from the Utilities menu choose Config...and the General tab:
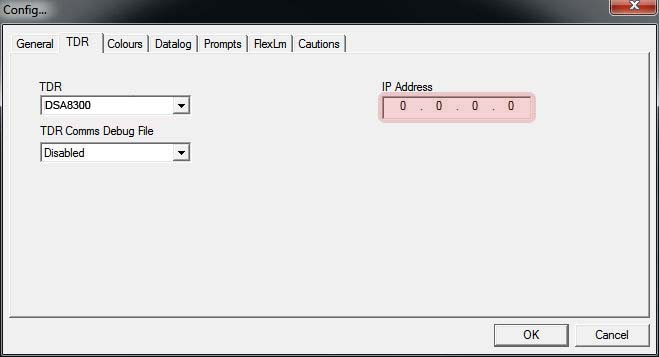
Ensure Enable Demonstration Mode is unchecked. Select the TDR tab:
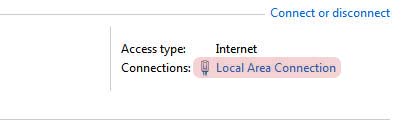
Atlas is shipped with the TDR IP address set to 0.0.0.0; this must be changed to that of the TDR. (The IP address of the TDR may be confirmed as described above.) Configuring the host PC's network The dialogs in this procedure will vary with operating system; these describe the process for Windows 7 but are similar to those of Windows XP. Windows 7 From Control Panel, choose Network and Sharing Centre and click Local Area Connection:
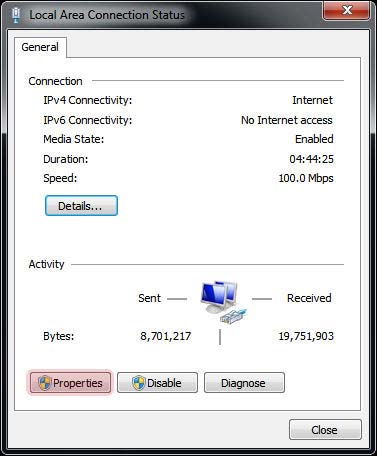
The local area connection status is displayed – choose Properties:
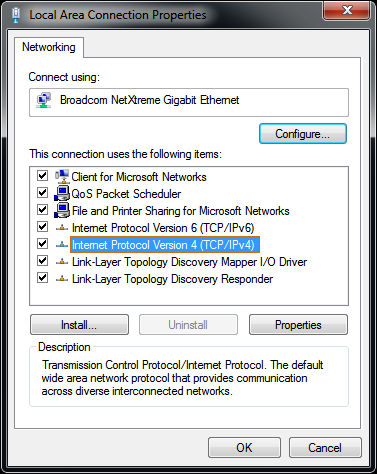
Choose the IP Protocol Version 4 and click Properties:
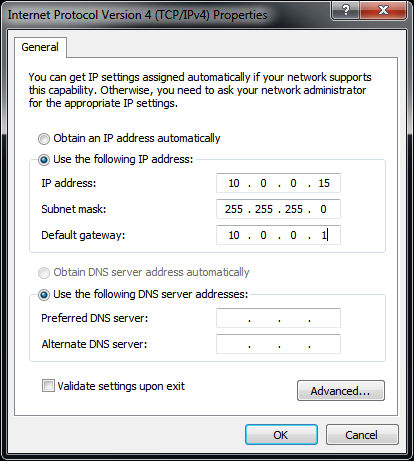
Specify the IP Address and subnet mask – leave the rest unchanged:
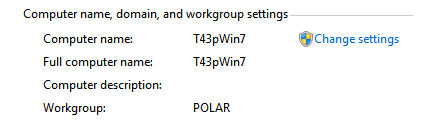
Note that the IP address and subnet masks should relate to those of the TDR. Changing the workgroup name From the Windows 7 Control Panel choose System and click Change settings:
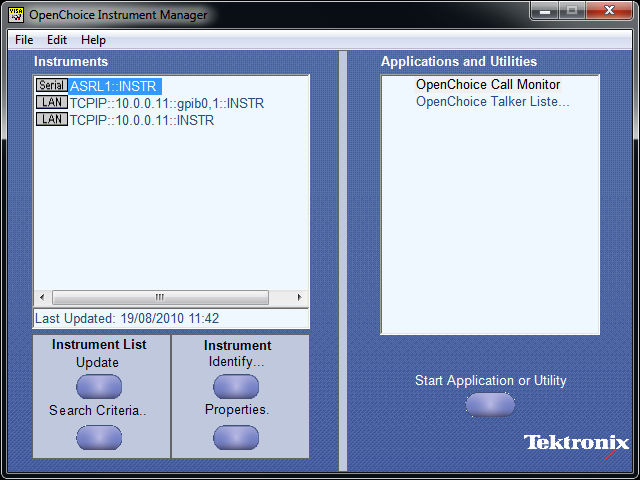
From the System Properties tab click Change... and ensure the computer is joined to the same workgroup as the DSA8300 (rename the workgroup and restart the machine if necessary.) Windows XP The dialogs for Windows XP network settings are similar: from the Windows XP Control Panel choose Network Connections, right click the Local Area Connection entry and choose Properties, choose Internet Protocol (TCP/IP) and click Properties; set the IP address and subnet mask as described above. Note: it may be necessary to alter the settings of the Windows 7 or Windows XP firewall to allow communication between the host PC and the DSA8300. Updating the TekVISA Instrument List When both addresses have been assigned, start the TekVISA Resource Manager on the host PC and Update the Instrument List. You should see the TDR reporting back its IP address as shown below.
Run the Atlas software, create a sample test file and click the Test button to verify connection. |